Technical Tip
As well as the procedure described below, you can create a new user by copying an existing user – refer to "Copying Users" for more information.
|
|
|
Technical Tip As well as the procedure described below, you can create a new user by copying an existing user – refer to "Copying Users" for more information. |
To create a new MOO user:
Refer to "Admin".
MOO clears the fields on the Admin screen.
|
|
Field |
Value |
|
|
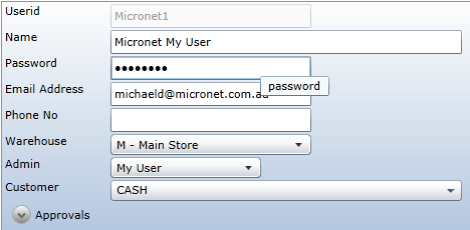
Userid |
Enter a unique ID for the user. Micronet checks that this user ID does not exist before allowing you to continue. |
|
|
Name |
Enter the user's full name for identification purposes. |
|
|
Password |
Enter a password for the user. Passwords must be at least six characters long. |
|
|
|
Technical Tip Users with a higher level of security can see passwords of users, as a tool tip, by hovering the pointer over the Password field.
|
|
|
Email Address |
Enter the user’s email address for sending web order confirmations. |
|
|
Phone No |
Enter the user's phone number. |
|
|
Warehouse |
Select the user's default warehouse from the list. |
|
|
Admin |
Assign a level of security to the user:
|
|
|
Customer |
Select the customer code from Micronet. If there is a large number of codes, you can also select this field then type in a code to display all codes starting from that code. |
|
|
Approvals |
Select the Approvals option to add levels of security. Refer to "Setting up User Approvals" for more detail. |
|
|
Favourite |
Check this box to make the Favourites button on the navigation bar available to this user. Otherwise, leave it unchecked. |
|
|
View Orders |
Check this box to make the View Orders button on the navigation bar available to this user. Otherwise, leave it unchecked. |
|
|
My Account |
Check this box to make the My Account button on the navigation bar available to this user. Otherwise, leave it unchecked. |
|
|
Quick Add |
Check this box to make the Quick Add button on the navigation bar available to this user. Otherwise, leave it unchecked. |
|
|
Edit User |
Check this box to allow this user to maintain their own users. Otherwise, leave it unchecked. |
|
|
Checkout |
Check this box to make the Checkout button on the navigation bar available to this user. Otherwise, leave it unchecked. |
|
|
Reset Password |
Check this box to prompt the user for a new password on their next login. |
|
|
Forward Orders |
Check this box to have all orders created by this user sent to the “Supervisor” for approval. |
|
|
Show Alt Part No |
If alternate part numbers have been enabled, check this box if you want this user to be able to view and search on alternate part numbers on the Order Entry screen. Otherwise, leave it unchecked. |
|
|
Catalogue |
Check this box to make the Catalogue button on the navigation bar available to this user. Otherwise, leave it unchecked. |
|
|
|
Technical Tip The Catalogue option is user configurable. Depending on your website configuration, this option may have a different name both in the navigation bar and on this screen. |
MOO saves the user and adds them to the list at the bottom of the screen.